Feel free to drop a comment telling about any variations you might have used or recipe ideas you might have or even email to share your photo and recipe of a Crooked Gap Farm product!

Thanks for stopping by!
~Becca

Sunday

BBQ Rib Rub ~Miles Jascha

This photo and recipe of our CGF ribs is courtesy of Miles Jascha, co-author of Savory and Sweet.

 
BBQ RIB RUB RECIPE
•1/2 cup brown sugar
•1/4 cup paprika
•1 tablespoon black pepper
•1 tablespoon salt
•1 tablespoon chili powder
•1 tablespoon garlic powder
•1 tablespoon onion powder
•1 teaspoon cayenne
Combine all ingredients together and and transfer to an air tight container.

RIBS:
1.Generously sprinkle rub on ribs and massage into the meat.
2. Preheat smoker or grill to around 165-185. Put the ribs bone down on the grill and smoke for 3 hours. Every hour spritz some apple juice on the ribs (helps keep them moist).
4. After smoking for 3 hours, wrap the ribs in heavy duty foil and put back on the grill. Raise the temperature to 225 and cook for 2 hours.
5. After the 2 hours are done pull the ribs out of the foil and place directly on grill and the 225 degrees. Using your favorite BBQ sauce spread onto the ribs and continue cooking for 1 hour. The BBQ sauce will make a nice sticky glaze. Let rest for about 10-15 minutes and serve with your favorite BBQ sides.


Your new favorite BBQ sauce:  

Blueberry Barbeque Sauce:  
INGREDIENTS:
1 cup blueberries
⅓ cup red wine vinegar
½ cup beer (a full-flavored, bitter ale works well, like an IPA)
1 tablespoon molasses
1 teaspoon sugar or honey
4 cloves of garlic
1 teaspoon chipotle powder
1 teaspoon cumin
1 teaspoon Mexican oregano
1 tablespoon chili powder
1 teaspoon kosher salt
½ teaspoon fresh ground black pepper


DIRECTIONS:
1. Combine all in a sauce pan. Bring to a boil and then turn heat to medium low. Simmer for 20 minutes.
2. Let cool for 5 minutes and then puree with a blender or food processor.
3. Return pureed sauce to pan and bring to a simmer. It is now ready to be painted onto ribs.

Pork Hocks Braised with Potatoes and Apple ~ Christine Ano-Larson

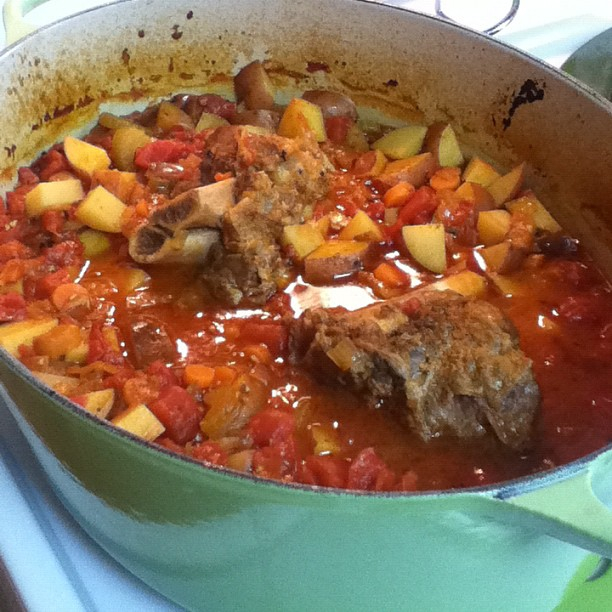
This recipe and photo of our Crooked Gap Farm pork hocks (shanks) was shared by Christine Ano-Larson.

Christine says, "I must say, it was the PERFECT fall dish. Here's the recipe I sort of followed in case you want to give it a go. It's AWESOME!"


This recipe, by Jonathan M. Forester, along with additional photos, can be found at Slash Food: http://www.slashfood.com/2007/08/13/spicy-braised-pork-shank/


Forester's Spicy Braised Pork Shank
1 pork shank
1 Vidalia Onion- rough shopped
1 gala apple- rough shopped
8 cloves of garlic- finely chopped
2 large shallots- finely chopped
1 cup rough chopped celery
eight small red potatoes, quartered.
1 large tomato or 2 small ones- rough chopped
1-2 jalapeno- seeds and veins discarded and finely chopped (use one if you only like a little bit of spice or two if you want a bit more. This isn't a very spicy dish and just has a hint of heat to boost the other flavors.)
4 oz. red wine
6 oz. white wine (Dry, sweet, it doesn't matter. I used a few ounces of a dry Chardonnay and a few of a sweet Late Harvest Riesling.)
2 tablespoons butter
2 tablespoons of soy sauce
1 tablespoon of Worcestershire sauce

Pre-heat your oven to 300 degrees. Cross hatch the skin on the shank, cutting all the way through the skin and fat, but not into the meat. Melt the butter in your dutch oven and saute the shank at medium-high heat until the skin is crispy and puffed up and a deep golden brown. This caramelizing of the meat, skin, and fat, what is called the Maillard Reaction, will produce a deep and meaty flavor that really makes the dish.

Pour off all the accumulated fat and butter and then lower the heat to medium-low and add the garlic and shallots and saute for a minute or so.

Then add the celery.

The onions and apple.

The tomatoes and all the rest of the ingredients. Turn up the heat to high and bring to a boil. Turn off the heat, cover it, and put it in the 300 degree oven for two hours. Gently stir the ingredients and turn over the pork shank once every thirty minutes, but otherwise leave it alone. After two hours add the potatoes, submerging them in the sauce/cooked vegetables and cook for an additional thirty minutes without touching it.

Plate it on a big serving platter and then pull the meat from the bones and serve. Mmmmm... that looks great.

And tastes even better. This is a very rich dish and it actually made enough for three meals which I had over several days. The flavor developed even more after sitting in the fridge and on the third day I was moaning with pleasure as I finished it off. It was so good that I made it again, this time with smoked pork shanks which gave it almost a completely different flavor. Either way it's a great dish.

Saturday

Ham and Pickling/Brine ~Miles Jascha

This photo and recipe of our CGF ham is courtesy of Miles Jascha, co-author of Savory and Sweet.

Miles says, "This was the most delicious ham I have ever eaten, So much better than some store bought ham that came from a factory where the pigs are pumped up with antibiotics and hormones." 


Place your ham in the plastic container that you'll be using to cure it and fill it with water until the ham is covered. Remove the ham and then measure how much water is left in the container - this is how much water you'll need for your brine.

Based on how much water you have, use this ratio of salts and sugars to water. I had a 9 lb ham and had to double the recipe in order to cover the ham properly.

2 liters of water (a little more than 2 quarts)
3/4 cups of kosher salt
1 cup of turbinado sugar ( I used brown sugar which works just fine. The "raw sugar brand" uses turbinado sugar)
1/4 cup of molasses
1/4 teaspoon ground cloves
3 teaspoons Insta Cure No. 1

Stir into your plastic container water the salts, sugars and pink salt, and place your ham into the brine. Also use a meat injector to put a little of the cure into the center of ham near the bone. I find this helps even the thicker parts to get cured properly. If any parts of the ham bob above the surface of the brine, place a ceramic plate on top to weigh it down. I use a smaller cooler for this.

Place the container in the fridge, and keep it there for a span that equals one day per every two pounds. Halfway through the brining process, turn the ham over so all parts of it will be submerged.

After the brining is done, rinse the ham and let it soak refrigerated in clean water for 24 hours. When smoking for the last hour use a favorite glaze and glaze ham every 15 minutes.

Monday

Lard Facts

Types of Lard
Leaf Lard: The highest grade of lard, from fat around the kidneys. Produces delicate, pure, snow-white lard. Can be used for any cooking but is prized for pastries.

Regular Lard: From the fat around the muscles. Renders into a wonderful lard for any type of cooking. Produces cracklings which are bits of fried meat that can be used in recipes or salted to make bacon bits.


About Lard
Unlike hydrogenated store bought lard, home rendered lard is a monounsaturated fat, comparable to olive oil. Since our hogs are raised year round outside, enjoying our woods and pastures, they also pack in additional omega 3’s and vitamins D, E, & A.

Home rendered lard is soft/semi liquidy at room temperature but can be kept in the fridge or freezer to harden. It has a very high smoke point, cooks at an even heat, and will bring out the wonderful flavor of your foods.

Lard can be substituted for any cooking oil, using 3/4 the amount called for.  We love to use it in our breads, pastries, cakes, and for frying and sautéing.


 Home Rendering Lard
Rendering lard is as simple as MELT (use a large pot or roaster on low), STRAIN (use a colander and cheesecloth to allow liquid lard to drip through), and STORE (lard can be stored in containers or jars to be frozen or refrigerated).  1 lb unrendered lard = ~ 2 cup lard

The following links are to our photo tutorials on rendering lard:
Rendering a small batch of lard
Rendering a large batch of lard

More Info
For more info on the home rendered lard and its health benefits, see the following sites:

Saturday

Rendering Lard - Small Batch of Leaf Lard

Rendering lard may sound a bit scary, but it is actually quite a simple process.  The steps consist of:
  1. Melt
  2. Strain
  3. Store
You can either to a large batch (click here for my large batch photo tutorial of rendering regular lard) to last through the year or small batches as needed.  When doing a small batch, just pull out a small pan or crock pot.  You can either render your lard overnight or for around 5-6 hours.  I prefer to use a small pan on the stove to have better heat control, but here is the crock pot method for those who don't want to leave their burners on. To produce a neutral flavored, pure white lard, it is better to start the temp too low and just add more time than to get done quicker but have your temps too hot.


Rendering Leaf Lard - Small Batch

Step 1:  Melt
I started with a package of frozen leaf lard, 1.56 lbs. 

I placed my leaf lard into my crock pot frozen yet - thawing will save about 1 hour when doing a small batch.

Next, I put the lid on my crock pot and turned it on low.  The key to rendering lard is low and slow.  You do not want your lard to bubble when cooking, just slowly melt.  This helps keep the flavor neutral and the color pure white.


After the lard has melted a bit (this photo was around 3 hours after starting), check your heat.  If you are using a crock pot, you might want to take off the lid or prop it open with a fork, especially if your crock pot cooks hot, like mine does.


Once your lard has fully rendered, in about 5-6 hours depending on your heat, there will be a thin layer of connective membrane left without very much fat remaining on it.  It is now time to strain.  Take out the unrendered portion. This can either be disposed or saved to render further.  (To render further when lard has been strained, slightly increase the heat by putting it in a sauce pot or covering with the lid.  This will provide a small bit of lard with a richer flavor - great for sauteing with.)


Step 2 :  Strain
Now is the time to get out your storage container, funnel (and possibly strainer if you are doing regular lard to catch the cracklings - click here to see photos on straining cracklings), and cheese cloth (found in the Walmart craft department).

Place a thick layer of cheese cloth on the funnel, over your container.  Pour your lard through the cheese cloth, allowing it to strain out any particles.


Step 3: Store
You will now have a jar of beautiful, amber colored, hot lard.  Set it aside to cool.  (My 1.56 pounds of produced around 2 1/4 cups of lard.)

Once completely cooled, your lard will turn into a snow white color.  If you plan on using it immediately, store in your refrigerator.   Otherwise, you can store it your freezer until needed.

Thursday

Rendering Lard - Large Batch of Regular Lard

Rendering lard may sound a bit scary, but it is actually quite a simple process.  The steps consist of:
  1. Melt
  2. Strain
  3. Store
You can either to a large batch to last through the year or small batches as needed (click here for my small batch photo tutorial of rendering leaf lard) .  When doing a large batch, you can use a large pot or electric roaster.  You can either render your lard overnight or for around 7 hours.  To produce a neutral flavored, pure white lard, it is better to start the temp too low and just add more time than to get done quicker but have your temps too hot.

Step 1: Melt
I started off with 3 frozen 4-5lb packages of ground Crooked Gap Farm lard. Start the heat low (mine was 1-2 on our electric stove) until you get a nice puddle of melted lard.  Once you get a nice puddle, you can turn the heat up a bit (I went from 3-5). Stir occasionally, taking care to scrape the bottom.  If your lard starts bubbling, you might want to turn it down.  This will keep the meat bits from scorching on the bottom.  I also like to use a heavy pan, in these pictures - my pressure canner pan, to keep the lard from scorching.  The bits of meat in the lard will start to float.  Once they sink again, your lard is ready to strain!
8:55 am :: Starting to melt frozen lard - It will render much quick if thawed first, but I was impatient!
9:50 am ::  Lard is melting nicely. I can turn up the heat a little since there is a good amount of melted lard.
11:14 am :: Lard "bricks" are gone.  Bits of meat are floating.  (You can actually start straining lard at this point if you like - the first few batches will be your whitest lard.)
3:05 pm ::  Came in from chores to find bits of meat had sunk to the bottom.  Done!

Step 2: Strain
I recently discovered how helpful it is to use two strainers when straining the lard.  The bottom strainer has a layer of cheesecloth (found in the Walmart Craft department for making ghosts and things).  The cheesecloth will strain out the tiniest bits of meat and allow the liquid to drip through. The top strainer catches the larger bits of meat and keeps the cheesecloth less clogged up.  The bits of meat caught in the top strainer can be returned to the pan to melt down further and further until you get cracklings, if you like them. (Click here for my crackling photo tutorial.)You can either strain your lard into the container you want to store it in, another pan to keep it warm before filling smaller containers, or straight into smaller containers - which I'm not so talented in doing.
Strainer 1 set up with cheesecloth over container.
Strainer 2 set inside strainer 1 to catch meat and help keep cheesecloth clean. 

Step 3: Store
After you have strained your lard and filled your sterilized containers, you need to set it aside and allow it to cool.  This can take a day or more to completely finish depending on the temperature and size of container.  You can either let your lard cool at room temperature or put it right into the freezer to get a more even consistency.  Lard will keep best if the final product is stored in the freezer, but it can also be kept in the fridge, root cellar, or on the counter if kept sealed.
After your lard has been strained into a container of your choice.  I used this large bucket since I have a project up my sleeves!  While your lard is still warm, it will have a deep amber color.  Just set it aside now to cool.
 
 Once  your lard has fully cooled, it will be a beautiful white color.
One of my favorite ways to store lard is in quart jars - ready to pull out and use for my cooking.  The lids will self seal as the lard cools.
  
Using your Lard
You may notice that your lard is quite soft and might almost be runny at room temperature - this is a good thing!  It shows the high quality of your lard - unlike the lard that has been hydrogenated at the grocery store. In order to make your lard easier to work with, you may want to put it in the fridge or freezer a bit before using it, especially if cutting it into pastries.

Ham and Eggs with Ham Hocks

Ham from CGF ham hocks adds thick, tender, juicy pieced of ham to CGF ham and eggs.